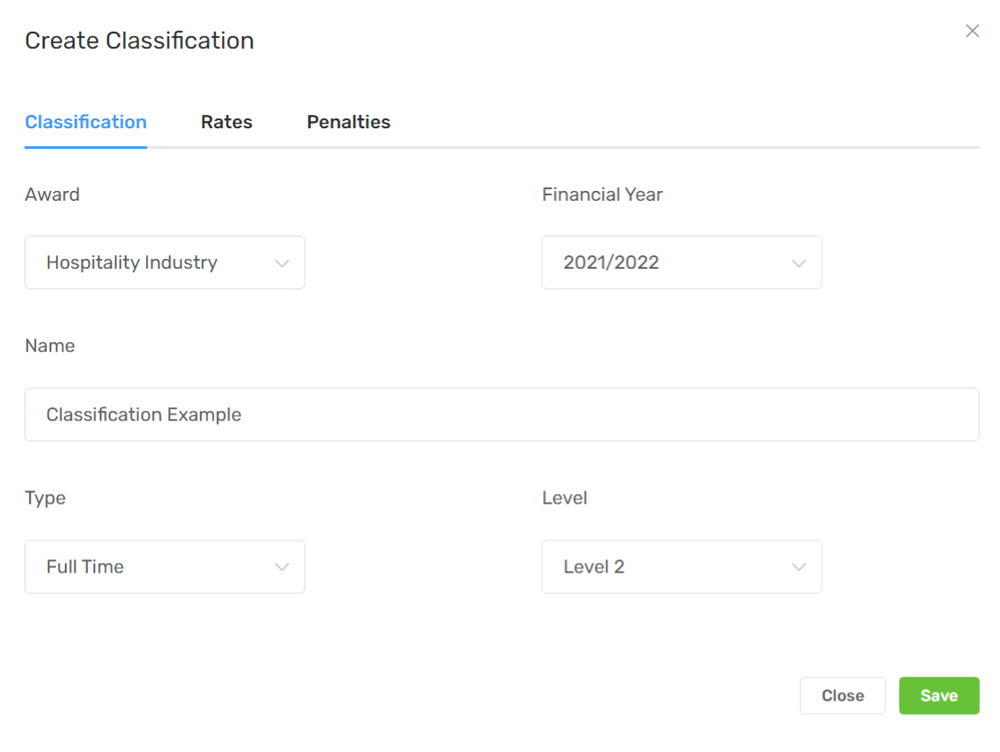
Team set up
-Employees
How to organise your team in Viability
Team Setup
To roster your team, you'll need to set up the Employees first.
You’ll then add the rates, penalties and team details.
It’s important your rates are established correctly. Then you’ll always know your true labour cost including WorkCover, Superannuation, penalties, overtimes and cash shifts.
Already using Xero?
If you’re integrated with Xero, you can simply import your team from Xero.
Our onboarding team can help with your integration and streamline your staff set up.
Create classifications
e.g. Casual Adult Weekday rate – Hospitality Award 2022
Penalty rates and overtime
e.g. Saturday and Sunday casual rate increases
Link penalties to classifications
Get accurate costs for every shift
Create positions (optional)
e.g. head barista, kitchen hand, sommelier
Add employees
Enter personal details and add a classification
1. Create Classifications
Classifications are the pay rates for your employees. Prepare these first.
Go to the Employees page and select the Classifications tab.
Classification Tab
- Award
- E.g. Hospitality award
- Which financial year?
- Choose the current year for current rates.
- Name the rate
- Create a unique name that you’ll recognise later.
- Choose employment type
- Full time, part time, casual or salary.
- Add a level (optional)
- Use the award level, choose your own, or select N/A if you don’t use level
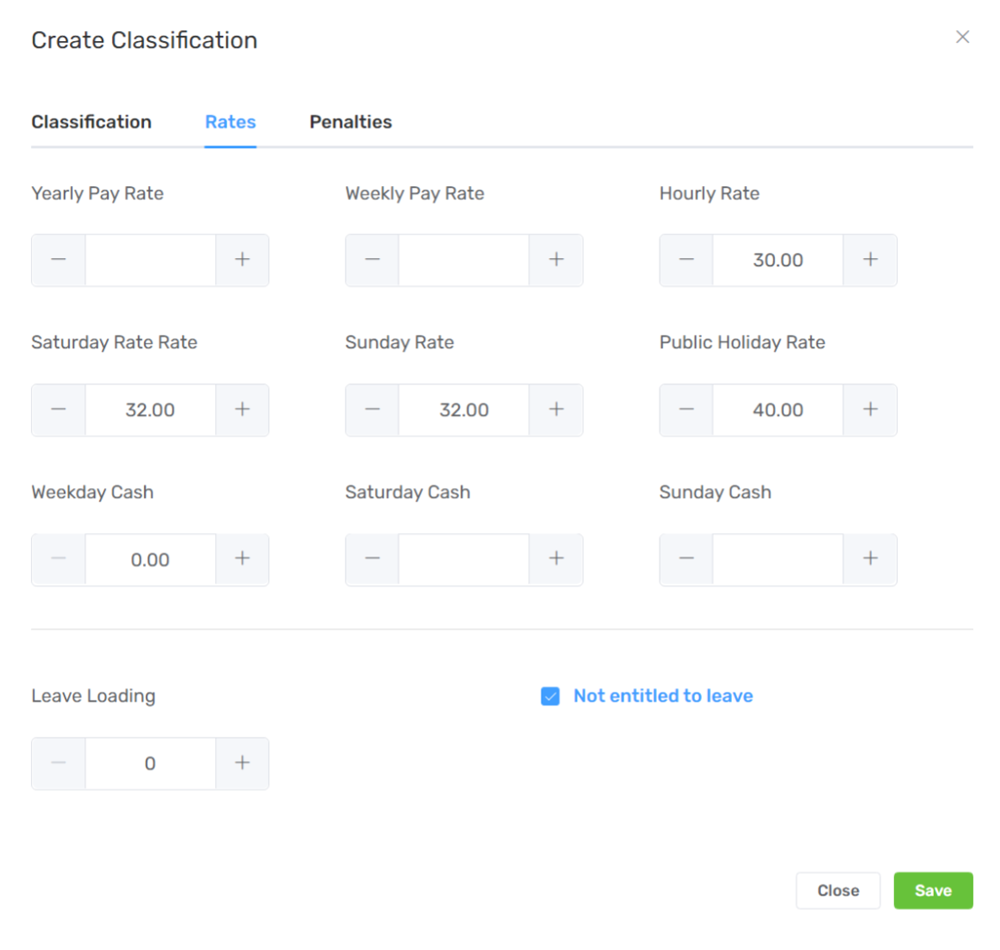
Rates Tab
Follow the instructions below for your employment type (casual, part time, full time or salary)
- Casual employees (Paid per hour)
- Fill in ONLY:
– Hourly Rate (standard rate for Monday to Friday) - Saturday Rate (full Saturday rate including any penalty addition)
- Sunday Rate (full Sunday rate including any penalty addition)
- Public Holiday Rate (full Public Holiday rate including any penalty addition)
- If the rate is casual or the agreement does not include paid leave, select the box “Not entitled to leave”.
- Fill in ONLY:
- Part-time & full-time employees (Paid on a pro-rata hourly rate)
- Fill in ONLY:
– Hourly Rate (standard rate for Monday to Friday) - Saturday Rate (full Saturday rate including any penalty addition)
- Sunday Rate (full Sunday rate including any penalty addition)
- Public Holiday Rate (full Public Holiday rate including any penalty addition)
- If the agreement does not include paid leave, select the box “Not entitled to leave”. Otherwise, all part-time employees will calculate a leave cost.
- Fill in ONLY:
- Salaried employees (Paid a standard weekly/ annual salary)
- Fill in ONLY one option:
- Yearly Pay Rate (full annual gross salary)
OR - Weekly Pay Rate (one week’s standard pay rate)
- Yearly Pay Rate (full annual gross salary)
- Fill in ONLY one option:
- Cash rate employees (Paid a cash rate, e.g. for trials)
- Fill in ONLY:
- Weekday Cash
- Saturday Cash
- Sunday Cash
- Select the box “Not entitled to leave”
- Fill in ONLY:
SAVE your progress.
Penalties Tab
If any classification includes a penalty rate, you’ll need to create the penalty before adding it here.
Don’t forget to save the classification before you exit.
How do I edit classifications?
Made a mistake or saved before you’d filled all the info? You can edit or amend a classification at any time by going to the Employees page, clicking on Classifications and using the pencil editor in the right hand column.
How do I delete classifications?
You can only delete a classification if it’s not assigned to any employees. If you have allocated the classification to an employee, you will need to remove the classification from the employee through the employee’s card before you can delete it. Then you can delete it using the red bin icon on the right.
2. Penalty Rates
Add penalties to your classifications for overtime or rate adjustments.
Penalties are special overtime or rate adjustments.
E.g. Some awards require overtime to be paid for each hour after 8+ or 10+ consecutive work hours.
Don’t worry about weekend/ public holiday penalties. You’ve already created Saturday, Sunday and Public Holiday rates in the classification set up.
To add a new penalty rate, go to the Penalties screen and click the blue plus in the top right hand corner.
Rate adjustment
- Applies when the rate rises at a certain time of day, regardless of how many hours the employee has worked.
- Eg. A special rate may apply for the hours from 22:00 to 24:00
- Enter the hourly rate as the additional cost per hour. Eg. If the classification rate is $20/h and the overtime rate is $23/h, enter $3 as the hourly rate in this.
- Do not enter a day rate.
Overtime
- Applies when the employee has worked more than a certain number of hours in a day. Eg. After the employee works 10 hours, an overtime rate may apply.
- Enter the hourly rate as the additional cost per hour. Eg. If the classification rate is $20/h and the overtime rate is $23/h, enter $3 as the hourly rate in this.
- Hours duration:
- In the min hours field, enter the hours that the employee needs to work before the rate applies.
- Eg. if the rate applies once the employee has worked 10 hours, enter 10.
- In the max hours field, enter the greatest number of hours this rate can apply.
- Do not enter a day rate.
If I have 1 or more types of penalty rates?
- If you have another penalty rate, make a new one.
- Eg. Enter $6 as the hourly rate in this.
- In the min hours select 14 and max hours 18 (determined by you)
Don't forget to save before
exiting the Create Penalty screen.
3. Link Penalties to Classifications
Penalty rates can be linked to any classification.
Once a penalty rate is established, you can link that penalty (for overtime or rate adjustments) to as many classifications as you’d like.
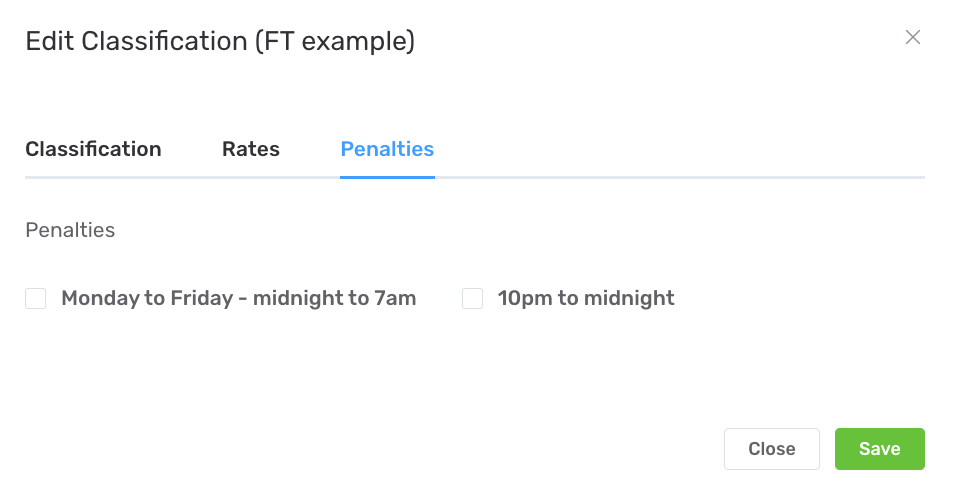
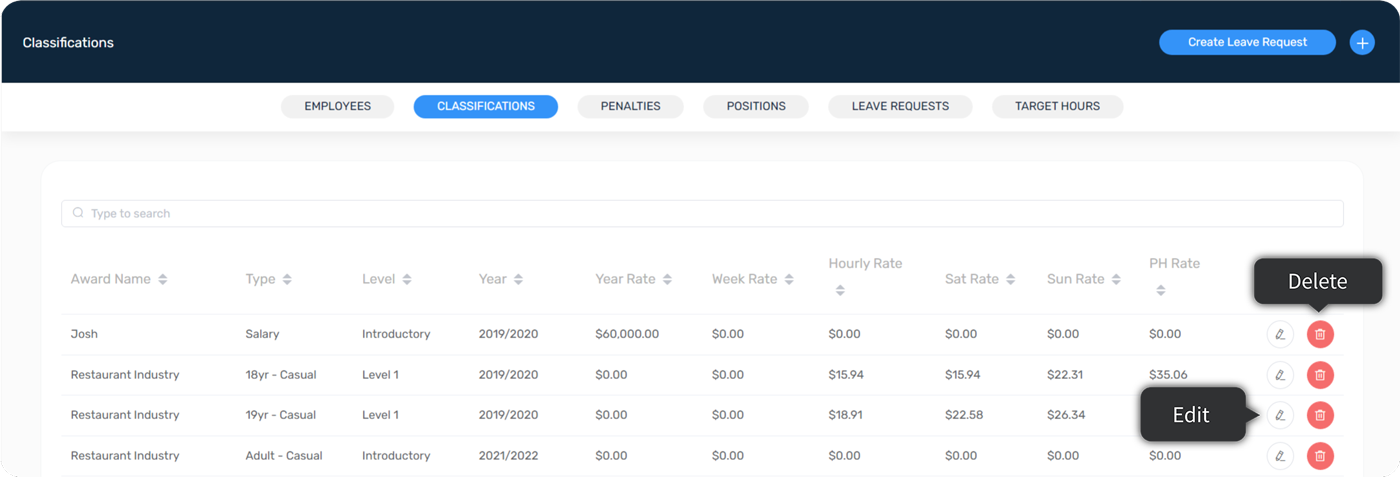
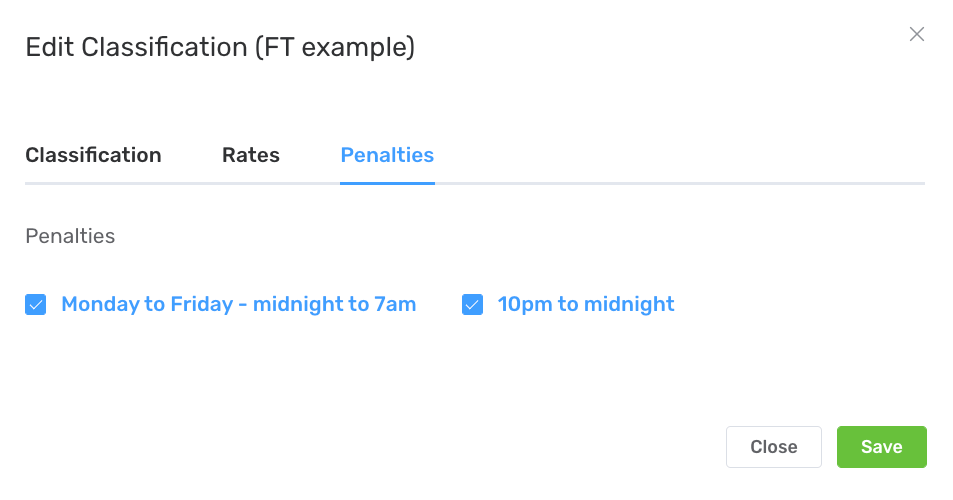
Go to the Classifications screen and select the edit pencil icon (right) for the classification to which the penalty will apply.
Go to penalties tab.
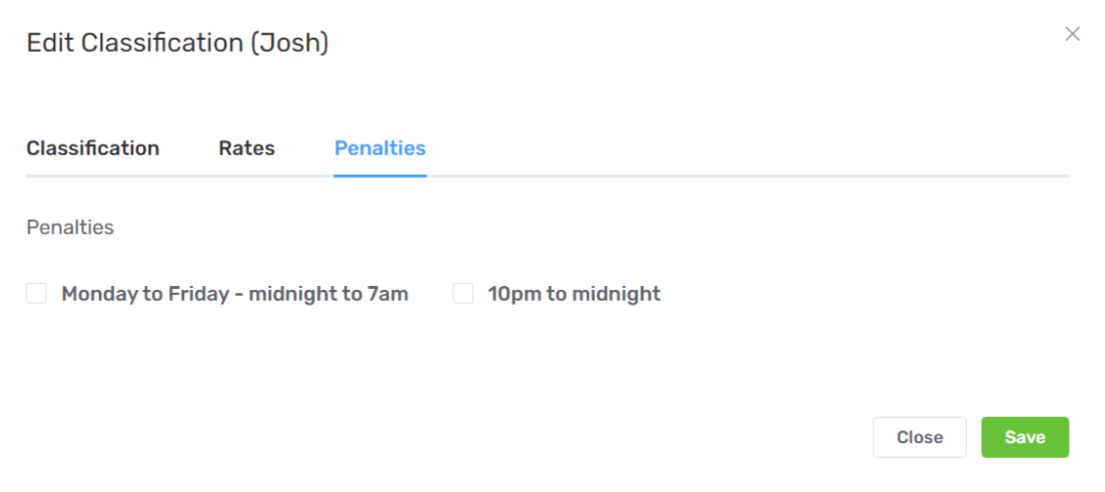
Select the penalty rates that should apply to this classification.
Select all that apply.
4. Create Positions
Positions help you and your team see at a glance what’s happening on shift.
When are POSITIONS optional?
- Most of the time! When it’s already clear what role each employee/s will take, based on their department.
- Eg. if your team are employed in defined roles, you don’t need to create positions. Just assign them to work in their department and they’ll know what to do! But, for example, if several commis chefs work as kitchen porters or dishwashers on rotation, it could be useful to differentiate on the roster. Likewise if your baristas take different positions on the machine and you’d like to make that clear on the roster – positions one way to do this.
When are POSITIONS required?
- To differentiate your team. Your roster will display these positions. Eg. if you have multiple baristas and need to differentiate specific positions on the roster to avoid confusion.
- If you have employees who are paid different rates for different roles, you can assign specific pay rates to an employee according to the position they’re working on a shift.
What’s the difference between departments and positions?
DEPARTMENTS
Refer to the sections where your team work. Usually you’ll have 3-5 departments, depending on your venue.
Eg. Kitchen, Coffee, Bar, FOH, etc
POSITIONS
Refer to the specific roles of the staff within their department. Eg. within FOH, you may have servers, supervisors, maître d, sommelier, etc
Go to the Employee section and then go to the Positions tab.
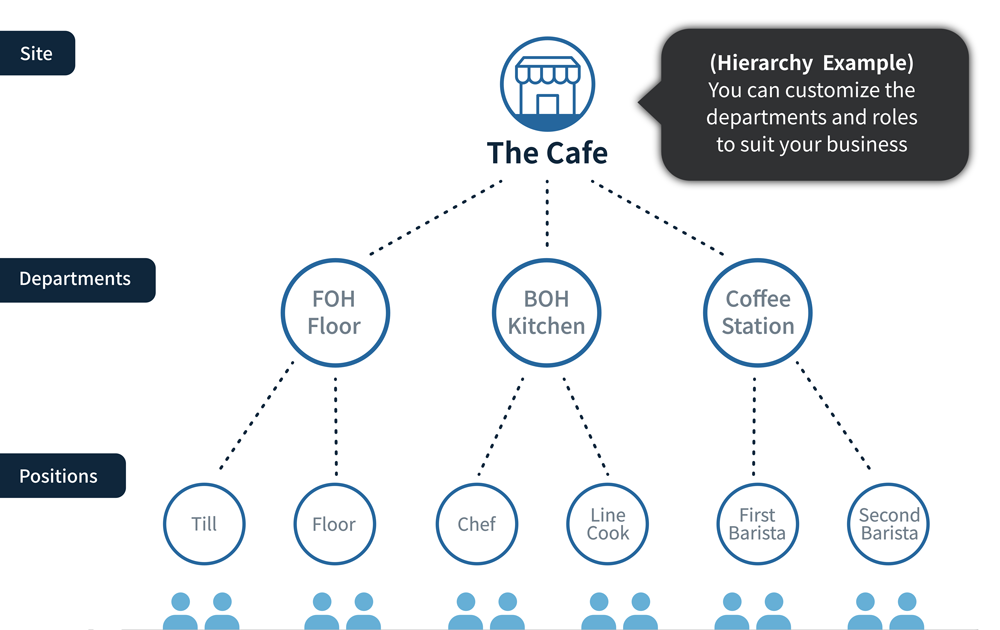
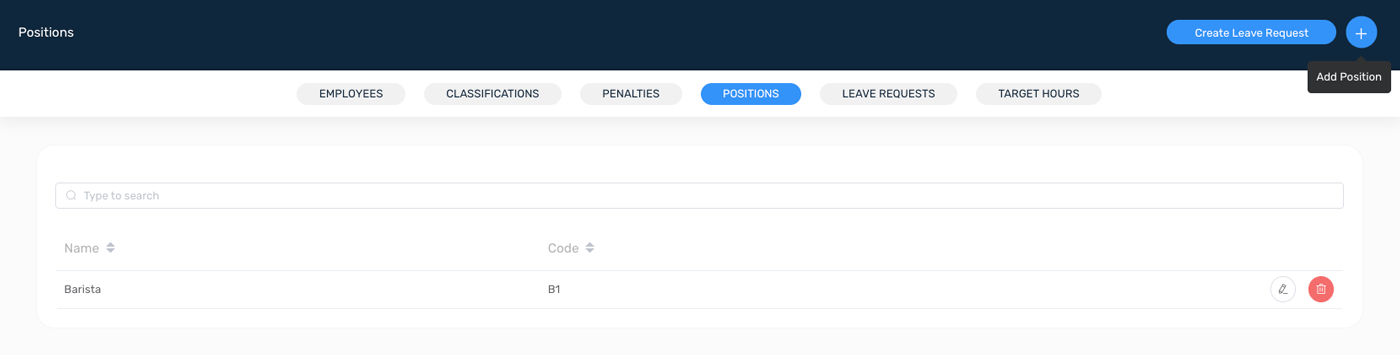
Add a new position with the plus button in the top right or edit existing positions with the pencil icons in the right hand column.
5. Create employees with classifications
Once you’ve set your classification and penalty rates, simply link them to your team.
Navigate to the Employees tab. If you’ve already set up your team’s cards, you’ll see them here. If you need to set them up, click the blue plus (top right) to add new employees. You will need only first name, last name and date of birth to create an employee’s card.
To add your employees, click the blue plus (top right). You will need only first name, last name and date of birth to create an employee’s card.
Enter: Name, Last name, Email and Date of birth (DOB)
Select Departments where the employee will work. Employees can only be added to the roster in the departments you choose here. Allocate positions if required.
Following the same tab, select the type of classification. Set the effective date to the date the employee started or the date you want to backdate your data. No rate will apply to the employee before the date you choose.
Don't forget to save before
exiting the Create Penalty screen.
FAQs
No. When it's already clear what role each employee/s will take, based on their department.
Eg. if your team are employed in defined roles, you don't need to create positions. Just assign them to work in their department and they'll know what to do! But, for example, if several commis chefs work as kitchen porters or dishwashers on rotation, it could be useful to differentiate on the roster. Likewise if your baristas take different positions on the machine and you'd like to make that clear on the roster - positions one way to do this.
To differentiate your team member's roles on the roster OR to apply a different rate to an employee based on the role they're performing on a given day. Your roster will display these positions. Eg. if you have multiple baristas and need to differentiate specific positions on the roster to avoid confusion.
If you have employees who are paid different rates for different roles, you can assign specific pay rates to an employee according to the position they're working on a shift.
Didn't find an what you are looking for?
If your question is not in the FAQs list, feel free to reach out for additional support and guidance.